
You can export a trip from the Trip Planner in a format for a GPS unit (ie. GPX file). You can then import it into free Garmin software, like BASECAMP and then upload it to your GPS unit or else load it directly to your GPS unit.
NOTE: the trips are exported from the Trip Planner and contains your trip points as well as routes, but they are exported as TRACKS (in Garmin terminology) and the TRACKS are imported into BASECAMP. This means that they are static and cannot be changed. A track will NOT give you turn by turn directions – you simply follow your location marker on the GPS screen as you move along.
Why? Because we find that when people load Routes to their GPS these are then recalculated by the GPS and these routes may not follow the original route as intended. So we keep things static.
Also note that TRACKS are NOT Re-calculated by the Garmin, like Routes are for example.
(It is important that your GPS unit can accept and display tracks, not all devices has this capability, see further below for more info in that regard. In this case you will have to use your waypoints to navigate on the device.)
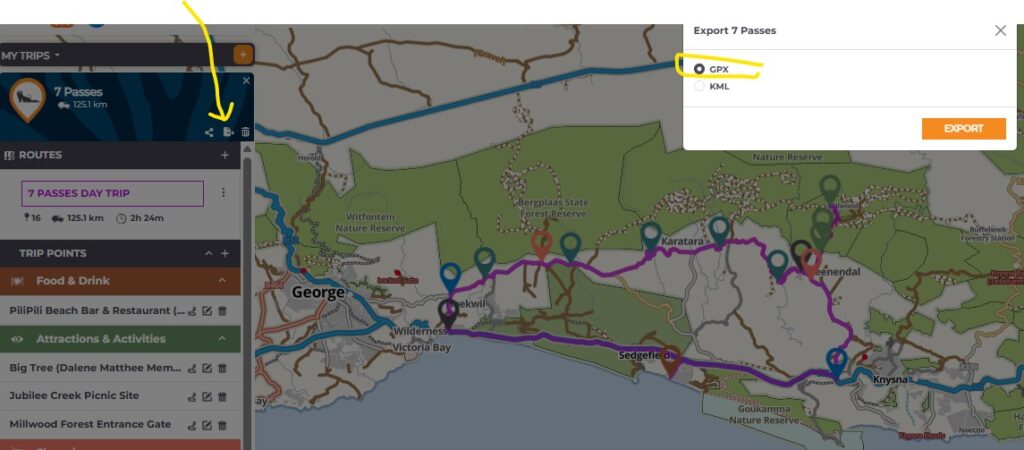
How to export a trip #
See this guide on how to export a trip.
How to get the Trip onto your GPS #
There are 2 ways:
- Import your trip to BASECAMP (Freeware from Garmin) and then export and import to your Garmin GPS unit
- Skip BASECAMP and copy the GPX file straight onto your Garmin GPS unit.
Importing your trip via BASECAMP #
How to import your trip into BASECAMP #
Once you have exported your trip:
Open BASECAMP and follow these steps:
- In the top left window highlight “Collection”
- Click on FILE
- Then click on “”Import into Collection”…
- Choose your file and import it
See this example: you will notice your file imported. See below how it imported the PoInts and the Track right at the bottom.
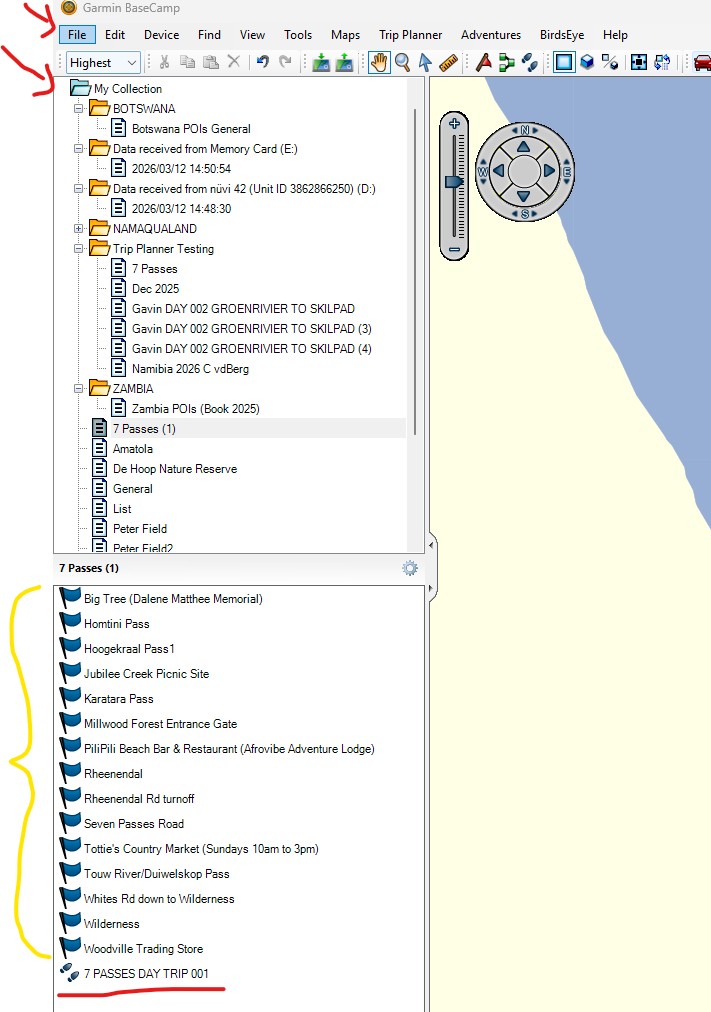
Notice the track on the map: for example:
If you right-click on your track and choose “Show on map” – BASECAMP will show your track:
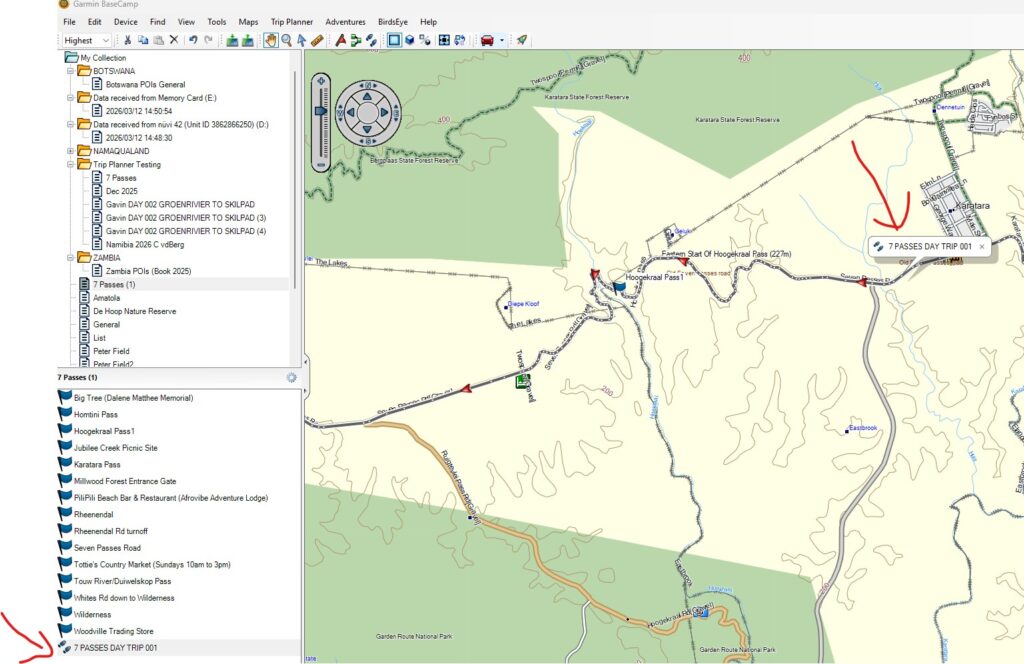
Exporting the track to your GPS unit #
Connect your GPS unit to your PC.
BASECAMP will pick up your GPS unit.
Make sure your Track is highlighted.
Choose Device – and then “Send to Device”.
The track will now show up on your Garmin unit.
Importing your trip without BASECAMP #
You will have to send GPX file to an SD card in your GPS unit. The GPX folder will be located in the Garmin folder on the SD card. Example:
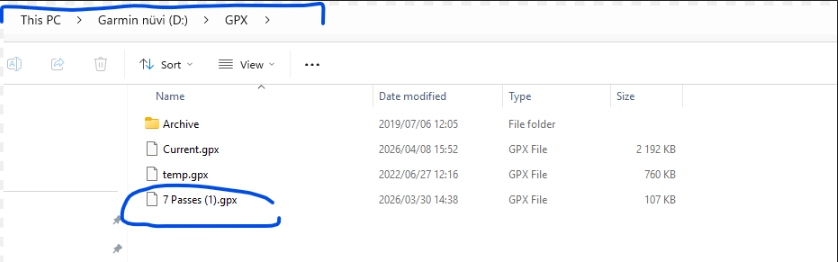
Some units may use a Garmin/NewFiles folder.
How to find the tracks on your GPS unit #
Various GPS units save them differently – Look for:
- Tracks
- SAVED tracks
- Collections
- Track Manager
- Apps – Tracks
- Trip Planner
- Explore
Once you have found the track in question on the device, you also have to open it and select “show on map” as “on” not off (off is the default setting) and then you can also select which colour to display it in etc.
Device capabilities #
Please note that tracks CANNOT be exported to:
- Your City Navigators, like the Garmin Drive Range, does not have the ability to display tracks. (ie. in most cases the POIs/Waypoints will be exported and you can route to those with your GPS)
- The Garmin Overlander (ie. been discontinued): can only import routes. So routes must be exported one by one from the Trip Planner and imported into BASECAMP.
- One can try to take the GPX file exported from Trip Planner, import it into Garmin BASECAMP, and then create a route from the tracks – as the Garmin Device can see routes. (But note the Garmin GPS may recalculate your route once imported)
Tracks CAN be exported to – for example:
- Your Outdoor Devices, such as the Montana, Zumo, 276, Etrex, are able to display tracks.
Alternative approach for devices that cannot accept tracks:
Plan trip on our Trip Planner. Still export the trip and load to your GPS. The trip points will now be under your Favourites on the GPS, making it easy to search for them when en route.
Load our Tracks4Africa app to your phone: find it on the Google Play store or Apple store. Then import the trips from trip planner to your app. This way you can see your planned routes while offline in the bush.
You then use your GPS, loaded with T4A maps, to create a route to the next point on your trip by looking for them under Favourites. You let the GPS calculate the route on the fly and you can compare it to what is on your phone. If you are happy with it, then follow the GPS instructions. If you have to make a detour the GPS simply recalculate your route and you can again consult your phone.
In future we plan to have offline route calculations on the app as well.
On a Montana: #
Can handle tracks and routes.
Find the track under “saved tracks”. Then select the track and choose to display it on the screen. Your track will show on your screen.
For routes choose “where to” and selected “routes” – your route will be in a folder. Choose “GO” and it will start importing shaping points. It may take a while (about 2 minutes) but when done, the route should show perfectly on the device, exactly the same as on the Trip Planner.


 Tracks4Africa